This RV Garage/Shop Project is Part of a
Larger New Home, Pool, Cabana and
Casita Project for HCBR Texas.
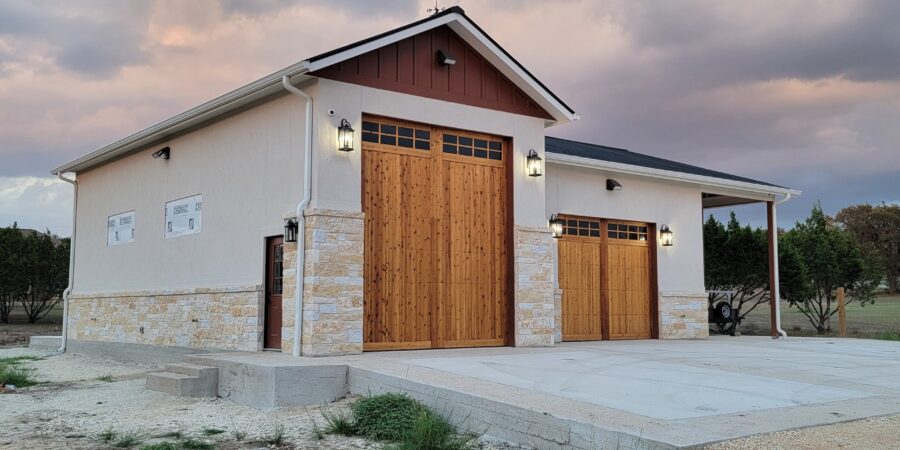
This is where we are today, finished up the 2 part exposed aggregate
as a part of the 3000 sq. ft. perimeter concrete pour.
This driveway design will continue out to the street.
![20211126_123339[1] 20211126_123339[1]](https://hillcountrybuildingandrenovation.com/wp-content/uploads/2022/05/20211126_1233391-scaled-600x450.jpg)
As is not typical in the Texas Hill Country, this building site is
uncharacteristically void of rock. The exterior and interior concrete
beams were excavated down 4 feet before reaching a solid bed of caliche.
Yeah, this is how you pound in foundation stakes in Texas
![20211223_120535[1] 20211223_120535[1]](https://hillcountrybuildingandrenovation.com/wp-content/uploads/2022/05/20211223_1205351-scaled-600x450.jpg)
After the plumbing is roughed in the vapor barrier is placed, then
a whole lot of steel reinforced rebar is bent and placed just right
to achieve a strong, long lasting foundation.
![20211223_120706[1] 20211223_120706[1]](https://hillcountrybuildingandrenovation.com/wp-content/uploads/2022/05/20211223_1207061-scaled-600x450.jpg)
In addition to the shop slab, we are also pouring an additional
4850 Sq. Ft. for the house slab.
Man, that’s a lot of concrete!
Pouring in the dark? Yeah, with a large pour like this there just isn’t
enough daylight to do it all before the sun goes down.
It’s better to start in the dark rather than try to finish in the dark.
Double pumping, now that’s the way to go.
These big pumpers can move what ever is thrown their way.
![20211228_125703[1] 20211228_125703[1]](https://hillcountrybuildingandrenovation.com/wp-content/uploads/2022/05/20211228_1257031-scaled-600x450.jpg)
I have used a lot of concrete companies over the years but somehow I just wasn’t satisfied. These guys are simply the best, they really do a great job. Now I am satisfied 🙂
![20220103_121418[1] 20220103_121418[1]](https://hillcountrybuildingandrenovation.com/wp-content/uploads/2022/05/20220103_1214181-scaled-600x800.jpg)
With concrete in the rear view mirror
it’s time to focus on some framing.
![20220105_134632[1] 20220105_134632[1]](https://hillcountrybuildingandrenovation.com/wp-content/uploads/2022/05/20220105_1346321-scaled-600x450.jpg)
A lot of lumber in this simple shop structure.
![20220115_172428[1] 20220115_172428[1]](https://hillcountrybuildingandrenovation.com/wp-content/uploads/2022/05/20220115_1724281-scaled-600x450.jpg)
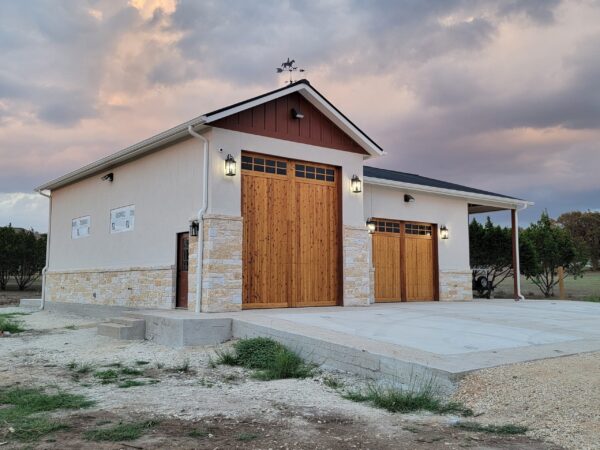
RV Garage 18’x45′, Shop 24’x40′ and then a
covered storage area 12’x40′
On the back and right side we were able to use Hardie lap siding.
![20220209_133022[1] 20220209_133022[1]](https://hillcountrybuildingandrenovation.com/wp-content/uploads/2022/05/20220209_1330221-scaled-600x450.jpg)
That’s a lot of roof decking to get up on top,
hand over hand, one sheet at a time.
![20220211_121529[1] 20220211_121529[1]](https://hillcountrybuildingandrenovation.com/wp-content/uploads/2022/05/20220211_1215291-scaled-600x450.jpg)
Now, that’s a lot of room to put a lot of stuff.
It will be climate controlled of course.
Now, let’s get the Hardie lap siding and Board & Baton painted. I love the accent color with the siding, the stucco and the stone.
Wait for it, it is stunning. My wife is the Queen of Colors. I have learned to just follow her lead and I have never been disappointed.
Works well with more than paint colors too!
Stucco is next in line, and a lot of it!
Stucco is done. See how the colors are coming together?
Shop doors are next. Roll up doors on the back and right side for side and back access.
Also opening the doors creates a really nice breeze/wind tunnel.
Panel doors in the front, just to make the HOA happy.
Well, we love these doors too.
![20220331_104020[1] 20220331_104020[1]](https://hillcountrybuildingandrenovation.com/wp-content/uploads/2022/05/20220331_1040201-scaled-600x450.jpg)
With a Sherwin Williams oil based clear finish,
it really brings out the cedar characteristics.
![20220330_133049[1] 20220330_133049[1]](https://hillcountrybuildingandrenovation.com/wp-content/uploads/2022/05/20220330_1330491-scaled-600x450.jpg)
We have 2 more of these cedar doors all sealed and ready to be
installed in the main house garage when the time comes.
One of the reasons we built the shop first was to
be able to store materials for the house project.
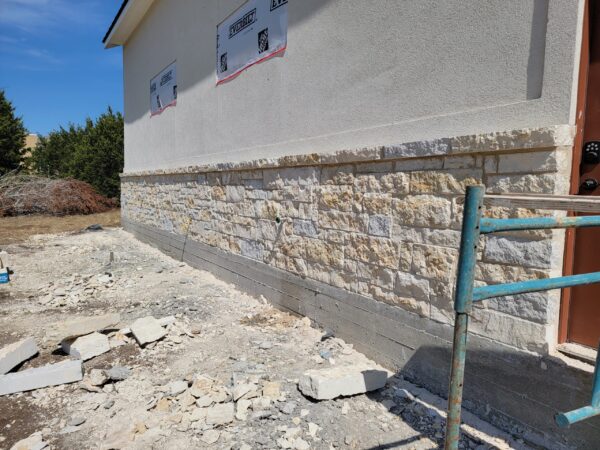
We combined 3 different stone colors to achieve
the look we were seeking.
![20220518_121754[1] 20220518_121754[1]](https://hillcountrybuildingandrenovation.com/wp-content/uploads/2022/05/20220518_1217541-scaled-600x450.jpg)
Now that the exterior is complete, we have some flatwork to pour around the exterior. 12 feet across the back, 12 feet along the right side, and then 25 feet across the front.
![20220518_123352[1] 20220518_123352[1]](https://hillcountrybuildingandrenovation.com/wp-content/uploads/2022/05/20220518_1233521-scaled-600x450.jpg)
My concrete guys pay a lot of attention to the details.
You just have to have a hat like that when working in the Texas sun!
Finishing concrete is a real art form.

![20211125_140727[2] 20211125_140727[2]](https://hillcountrybuildingandrenovation.com/wp-content/uploads/2022/05/20211125_1407272-450x450.jpg)
![20211228_060726[1] 20211228_060726[1]](https://hillcountrybuildingandrenovation.com/wp-content/uploads/2022/05/20211228_0607261-scaled-600x450.jpg)
![20211228_060925[1] 20211228_060925[1]](https://hillcountrybuildingandrenovation.com/wp-content/uploads/2022/05/20211228_0609251-scaled-600x450.jpg)
![20211228_060304[1] 20211228_060304[1]](https://hillcountrybuildingandrenovation.com/wp-content/uploads/2022/05/20211228_0603041-scaled-600x450.jpg)
![20211228_082621[1] 20211228_082621[1]](https://hillcountrybuildingandrenovation.com/wp-content/uploads/2022/05/20211228_0826211-scaled-600x450.jpg)
![20220103_123359[1] 20220103_123359[1]](https://hillcountrybuildingandrenovation.com/wp-content/uploads/2022/05/20220103_1233591-scaled-600x450.jpg)
![20220126_153627[1] 20220126_153627[1]](https://hillcountrybuildingandrenovation.com/wp-content/uploads/2022/05/20220126_1536271-scaled-600x450.jpg)
![20220126_160103[1] 20220126_160103[1]](https://hillcountrybuildingandrenovation.com/wp-content/uploads/2022/05/20220126_1601031-scaled-600x450.jpg)
![20220221_123757[1] 20220221_123757[1]](https://hillcountrybuildingandrenovation.com/wp-content/uploads/2022/05/20220221_1237571-scaled-600x450.jpg)
![20220211_122001[1] 20220211_122001[1]](https://hillcountrybuildingandrenovation.com/wp-content/uploads/2022/05/20220211_1220011-scaled-600x450.jpg)
![20220218_140356[1] 20220218_140356[1]](https://hillcountrybuildingandrenovation.com/wp-content/uploads/2022/05/20220218_1403561-scaled-600x450.jpg)
![20220218_133334[1] 20220218_133334[1]](https://hillcountrybuildingandrenovation.com/wp-content/uploads/2022/05/20220218_1333341-scaled-600x450.jpg)
![20220219_162851[1] 20220219_162851[1]](https://hillcountrybuildingandrenovation.com/wp-content/uploads/2022/05/20220219_1628511-scaled-600x450.jpg)
![20220219_162924[1] 20220219_162924[1]](https://hillcountrybuildingandrenovation.com/wp-content/uploads/2022/05/20220219_1629241-scaled-600x450.jpg)
![20220310_143159[1] 20220310_143159[1]](https://hillcountrybuildingandrenovation.com/wp-content/uploads/2022/05/20220310_1431591-scaled-600x450.jpg)
![20220310_143257[1] 20220310_143257[1]](https://hillcountrybuildingandrenovation.com/wp-content/uploads/2022/05/20220310_1432571-scaled-600x450.jpg)
![20220323_125036[1] 20220323_125036[1]](https://hillcountrybuildingandrenovation.com/wp-content/uploads/2022/05/20220323_1250361-scaled-600x450.jpg)
![20220324_125740[1] 20220324_125740[1]](https://hillcountrybuildingandrenovation.com/wp-content/uploads/2022/05/20220324_1257401-scaled-600x450.jpg)
![20220331_162405[1] 20220331_162405[1]](https://hillcountrybuildingandrenovation.com/wp-content/uploads/2022/05/20220331_1624051-scaled-600x450.jpg)
![20220325_140859[1] 20220325_140859[1]](https://hillcountrybuildingandrenovation.com/wp-content/uploads/2022/05/20220325_1408591-scaled-600x450.jpg)
![20220330_133144[1] 20220330_133144[1]](https://hillcountrybuildingandrenovation.com/wp-content/uploads/2022/05/20220330_1331441-scaled-600x450.jpg)
![20220328_204816[1] 20220328_204816[1]](https://hillcountrybuildingandrenovation.com/wp-content/uploads/2022/05/20220328_2048161-scaled-600x450.jpg)
![20220518_144150[1] 20220518_144150[1]](https://hillcountrybuildingandrenovation.com/wp-content/uploads/2022/05/20220518_1441501-scaled-600x450.jpg)
![20220423_170123[1] 20220423_170123[1]](https://hillcountrybuildingandrenovation.com/wp-content/uploads/2022/05/20220423_1701231-1-scaled-600x450.jpg)